The Future of QA Lies in Automation

David Skuratowicz, Managing Director of a3Ds GmbH in Braunschweig, Germany Photo: a3Ds
The measuring technology experts at a3Ds in Braunschweig are providers of 3D metrology services, component analysis and specialist personnel for industrial measuring technology. The team is specialised in automated, optical 3D measuring technology, the measurement of components of all shapes and sizes, full-surface component analysis and optical measuring services with GOM measuring systems, as well as manual and automated on-site measurements at the customer’s premises. Participation at Control has been a constant highlight in the company’s annual agenda for years. David Skuratowicz, managing director of a3Ds, discusses emerging trends in quality assurance in an interview with Schall trade fair promoters. There’s scarcely any doubt that the future of QA lies in automation.
Mr Skuratowicz, how important is Control for you and your company?
It’s the most important trade fair for us as an exhibitor. Control is the only trade fair we’ll exhibit at this year.
Why is that – what makes Control so important to you?
We establish qualified contacts at the event. The people we meet here have in-depth expertise in the field of measuring technology, they know what it’s good for and there’s no need to explain it – discussion goes straight to the point.
Do you experience tangible, measurable business success after participating at Control?
It varies. It’s interesting to note that some expert visitors and interested parties don’t get in touch until several months later and refer back to our discussion at Control. Apparently, it takes a while to find a solution in some cases and we’re only contacted after quite some time as a provider of measuring technology services. This demonstrates that the trade fair has a lasting effect. In any case, the success rate in terms of business is higher for us at Control than at other trade fairs.
Which highlights or innovations have you brought along to Stuttgart this year?
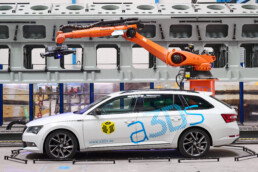
This year we’ll be exhibiting a robotic measuring cell for large components with a ten-ton rotary table. Our measuring cells are not off the shelf items. Standard measuring cells in various sizes are available from Zeiss, for example. We step in where large components are concerned that don’t fit into the standard portfolio. We’re receiving increasing numbers of enquiries in this area, and the market for these applications is growing. As a second highlight, we’ll be presenting a universal measuring fixture that we offer as a modular system consisting of hardware and software. This means that the user doesn’t have to buy several measuring fixtures – a single modular system can be used for many components. In combination with virtual clamping, the components are virtually clamped, measured at three contact points and then analysed.
Which trends are emerging in quality assurance – where is the QA sector headed?
In our opinion, the trend is moving towards more automation. Measuring processes are becoming increasingly semi-automated, for example with standard measuring cells and scan boxes. But the future will be fully automated. Measuring systems will be loaded automatically, which means that components will be fed, removed and sorted, and finally even packaged automatically.
Corresponding peripherals are required for this type of fully automated measuring process. Can you imagine a3Ds not only offering measuring technology in the future, but also expanding into peripherals as well?
Yes, this is exactly what we’re doing, we actually have an order of this sort at the moment. We’re currently setting up all of the peripheral equipment and will soon be commissioning the entire quality line for testing, after which it will be delivered to the customer. In light of current challenges, especially the prevailing shortage of qualified personnel, we see great potential in this approach.
So is it fair to say that the measuring technology supplier is becoming a measuring system specialist to an ever greater extent?
Yes, that’s right. The RFQs are already coming in and that’s probably where things are headed.
Are there any new measurement parameters or other parameters which will have to be measured in future?
This depends entirely on the respective application and the components. They can be optically digitalised from the outside, then additionally X-rayed, and parts might need to be weighed or examined for scratches – there’s no limit to what might come up. As soon as automation is implemented, free rein is opened up for all possibilities! Then we can incorporate laser systems or engraving systems, and the options for measurement, testing and inspection are virtually unlimited.
Everyone’s talking about the need for the conservation of resources and efficiency, as well as environmental and climate protection in industrial production – how would you assess the importance of measuring systems and quality assurance in terms of achieving established sustainability goals?
Any manufacturer who produces bad or faulty components will incur losses. And thus for economic reasons alone, quality assurance is essential. Lots of measuring, lots of inspection, fewer errors – that’s what efficient use of resources is all about. If you reduce scrap, waste less material and consume less energy, you automatically work cost-efficiently and sustainably. Profitability and sustainability are closely linked. And measuring technology is indispensable in this regard.

Portable Project Measuring Cell: The specialists at a3Ds in Braunschweig step in where large components need to be inspected. Photo: a3Ds